Audience Segments
An account segment is a group of accounts categorized based on any specific criteria such as firmographic/demographic, or engagement level.
These segments are used to organize and target accounts efficiently for marketing or advertising campaigns.
These segments are used to organize and target accounts efficiently for marketing or advertising campaigns.
Why is it Necessary to Create Segments for Campaigns?
- Personalized Targeting: Segments allow you to tailor messaging and ads to specific groups, ensuring relevance and higher engagement.
- Efficiency: Helps in organizing accounts into manageable groups, simplifying campaign setup and execution.
- Better ROI: Targeting segments with tailored campaigns improves conversion rates and minimizes wasted ad spend.
- Data Insights: Segments enable performance tracking and insights at a granular level, helping refine strategies for different account groups.
- Scalability: Makes it easier to replicate or optimize campaigns for similar accounts in the future.
Creating segments is the foundation for any successful Account-Based Marketing (ABM) strategy, ensuring campaigns are precise and impactful.
Create an Account Segment
There are three primary ways to create audience segments in Recotap:
Method 1: During New Account Addition
Segments can be automatically created while you're uploading target accounts into Recotap. This can happen through:
a) File Upload
When uploading a CSV file of target accounts:
- You'll be prompted to assign these accounts to an existing segment or create a new one.
- You can name the segment (e.g., "Q3 Finance ABM Accounts") during the upload process.
b) CRM Sync (e.g., HubSpot, Salesforce)
When syncing account lists from your CRM:
- You can map specific lists to new segments in Recotap.
- For example, syncing a list named “High Intent - Life Sciences” from HubSpot can directly create a segment with the same name in Recotap.
✅ Tip: This method is ideal when your account lists are already defined in your CRM or collected via manual targeting efforts.
Method 2: From the Segments Page
You can also create and manage audience segments directly from the Segments section within the platform. Here’s how:
- Go to Audience → Segments and click Create Segment.
- In the pop-up, enter a Segment Name, choose Static or Dynamic, and pick how to add accounts — File Upload or Filters.
- Click Next to continue to the selected method.
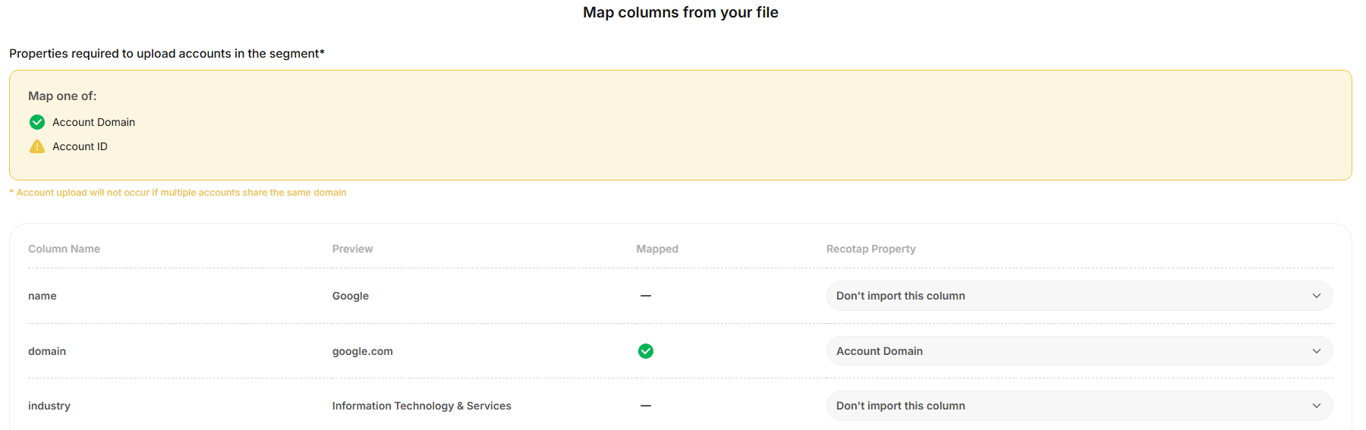
a) Via File Uploads
- Upload a CSV with account details.
- Map file columns to Recotap properties.
- Mandatory: Map either Account Domain or Account ID.
- Unmapped required fields trigger a warning.
- After mapping, you can Save as Draft or Activate the segment.
🔍 Note: Accounts not in your target list will be ignored.

b) Via Setup Filters
You can build your dynamic or static audience segment using one or more of the following filter categories:
Filter Category | Description | Source |
ICP (Ideal Customer Profile) | Filter accounts by firmographic or technographic fit like industry, company size, tech stack, etc. | Uploaded Data / CRM |
Journey Stage | Target accounts based on their stage in the buyer journey—Awareness, Consideration, Decision. | Recotap-calculated |
Account Attributes | Use synced firmographics such as lifecycle stage, lead status, or region. | CRM Integration (e.g., HubSpot) |
Website Activity | Segment by website visits, visited pages, session count, or visit recency. | Recotap Pixel |
G2 Intent | Include accounts researching relevant topics on G2. | G2 Integration |
Bombora Intent | Filter accounts based on third-party topic research and intent surges. | Bombora Integration |
Recotap Ad Activity | Create segments from ad engagements—impressions, clicks, campaign or creative-specific activity. | Recotap Ad Engine (LinkedIn, etc.) |
Deals | Filter accounts by deal stage, deal size, or deal status (open, won, lost). | CRM Integration (e.g., HubSpot) |
Sales Activity | Segment based on sales interactions like meetings, emails, or last contacted date. | CRM Integration (e.g., HubSpot) |
Example: Creating an Advertising-Based Segment
If you want to target accounts that are actively engaging with your ads, you might use:
- Recotap Ad Activity → Ad Impressions → > 5
- Within Last → 7 Days
You can filter further:
- By Campaign (e.g., “Product Demo Campaign”)
- By Creative (e.g., “Top-performing Static Ad”)
And chain additional logic:
- AND / OR: Ad Clicks > 2 within 7 days
Advanced Logic with Filter Groups
Recotap lets you build advanced segmentation logic using Filter Groups.
1. Filter Within a Group
Use multiple conditions to refine a single behavior or activity.
Example:
Accounts with:
- Ad Impressions > 5 AND
- Clicks > 1
(Both conditions apply within the same group.)
2. Add a New Filter Group
Create separate logic blocks that combine with AND / OR operators.
Example:
- Group 1: Recotap Ad Activity → Ad Impressions > 5
- Group 2: Website Activity → Visited “Pricing Page” in the last 7 days
(Only accounts meeting both groups’ conditions will qualify.)
Pro Tip:
Use multiple groups to mirror complex buying signals — for example, combining ad engagement, website visits, and intent data from platforms like G2 or Bombora.
Method 3: Add Accounts to a Segment from any Accounts List page
1. Navigate to the Account List
Go to any list that shows accounts:
- Audience → Accounts
- Data Signals → Any Intent Signals
2. Select Accounts
- Tick the accounts you want to add
or
- Click the ⋯ (three-dot menu) next to an account for more options.
OR
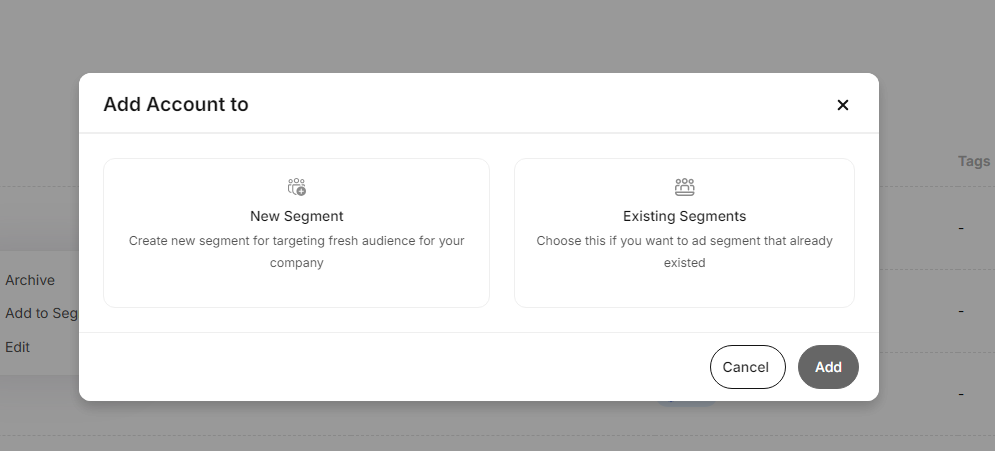
3. Choose “Add to Segment”
- Select Add to Segment from the menu. A pop-up window will appear.
4. Pick the Segment Type:
- In the pop-up, you’ll have two options:
- New Segment: Create a new one and give it a name.
- Existing Segments: Add to an existing one from the dropdown list.
Note:
Only file upload–based segments appear under Existing Segments.
Filter-based segments update automatically based on defined filters.
You can still manually remove accounts from any segment if needed.
Only file upload–based segments appear under Existing Segments.
Filter-based segments update automatically based on defined filters.
You can still manually remove accounts from any segment if needed.
5. Confirm
Click Add to finalize and save your selection.
Removing Accounts from a Segment
- Go to Audience → Segments.
- Open/Click the segment from which you want to remove accounts.
- Select the accounts to delete.
- Click Delete in the top-right corner to confirm.
Editing an Audience Segment
To edit a segment, go to Audience → Segments, click the three-dot menu next to the segment, and select Edit.
- For filter-based segments (dynamic or static):
You can update the filters and rename the segment. Click Update to save changes.
- For file-based segments:
- Upload new CSV files to add accounts.
- Duplicate entries are ignored automatically.
- Accounts not in your target list are skipped.
🔒 Filters cannot be applied to file-based segments.
 Made with Bullet